Understanding The Differents Between HTML vs. CSS
In simplest terms, HTML focuses on website structure whereas CSS focuses on website appearance. HTML defines things like “this section is the sidebar,” “this text is a list,” or “this word is a link.” With HTML, all of that jumbled text comes together into a nicely structured webpage.
Using CSS, you can easily change the appearance of your website and makes changes that are site-wide. You can keep the commands for the style stuff –fonts, colors, and so on – separate from the commands for the content. They’re called “cascading” because you can have multiple style sheets, with one style sheet that inherits properties (or “cascades”) from others.
For a lot of people, a simple web template is good enough. It’s only when you want to start customizing the look of a site that you need to delve into CSS.
How HTML and CSS connects?
Now here’s the thing. While HTML and CSS are distinct coding languages, the two overlap when it comes to hacking code for marketing. As marketers, we often work on an agile basis. We need to publish a blog post instantly, send an email immediately, or publish a landing page quickly. In these moments, we can’t wait for custom styling. We can’t wait for someone with domain expertise on coding to make our tweaks and adjustments. We need to launch our campaigns and start seeing results fast.
That’s where HTML and CSS overlap for us. While HTML traditionally focuses on structure, the code you’re about to learn will include HTML tags that will add some styling magic to your web content. Let’s dive in.
HTML language of the Web
Let’s start by understanding what an HTML tag is. An HTML tag consists of keywords within angle brackets (<>) that describe the way you want content to appear on a page.
Let’s describe this through a basic paragraph tag. It’ll look something like:
<p> Your paragraph content goes here. </p>
Every tag begins with open brackets (<p>) and ends with a closed bracket (</p>). This is just so the structure is laid out appropriately, but most importantly, so the web browser can interpret the language and know what structure it should display.
Let’s take a look at the basic structure of a web page, which always starts with <!DOCTYPE html>. This is so the browser understands it is reading an HTML structure:
<!DOCTYPE html>
<html>
<body>
<h1>This is our main header</h1>
<p>This is our first paragraph</p>
</body>
</html>
This small strip of HTML starts with a <body> tag in order to mark the beginning of the body content. Within this language, there are headers you can use to organize your content. These header tags range from <h1> to <h6>, with h1 being the largest-size header and h6 the smallest one (you’ll see these again in the second section).
And little by little, it all starts to come together. Some of the tags are pretty intuitive, like the <p> tag for paragraphs.
There are many additional HTML tags you can use to alter the structure to your web content, but from a general overview, this isn’t so bad, right? Now that you have a basic understanding of it, we can jump into 12 additional HTML tags you can use.
12 HTML Hacks That Will Make Rock Your Site
1. Header
The days of essay-like web content are quickly disappearing. Today, content you share needs to be structured in a user-friendly format that allows folks to either read the article in-depth or scan through the key points. Here are the top three header tags:
<h1> Your Header Text Here </h1>
<h2> Your Header Text Here </h2>
<h3> Your Header Text Here </h3>
2. Hyperlink
When creating content, you should always attribute information such as stats, quotes, or photos back to their original source. This goes beyond stating the source name. Ideally you should provide an inbound link to the source. Here’s the HTML tag to do that:
<a href="url"> Source URL </a>
3. Spacing
Paragraphs have about a 1.5 line spacing before and after each block of text, which can be seen in your content’s source code with a paragraph tag:
<p> With marketing love, </p>
<p> Anum </p>
Imagine formatting an email where you need the signature message and name to align. This is where you wouldn’t want the extra spacing, and can use the break rule:
<p> With marketing love, <br>
Anum </p>
If you wanted to insert nonbreaking space — for instance, extra space between words — you simply need to add the code:
4. Image
Visual content is used throughout your marketing. Let’s say you’re building a landing page and want to feature an image that visualizes the promotional offer available on that page. Here’s the code you’d see:
<img src="image file link" width="300" height="200" alt="keyword description">
You’ll notice that this code includes three important factors:
- Image File Link: This is the destination URL of the image. When you upload an image file to your CMS or COS (content optimization system), a URL is created for that image. This tells the internet where this image file lives.
- Image Size: Specify the width and height of your image. Hopefully your CMS or COS allows you to do this automatically, but if not, ensure the image size matches the proportions of the original file.
- Keyword Description: Despite all its advancements, Google’s algorithm can’t look at an image and tell you what it is. However, you can use keywords to describe the image so that Google’s algorithm can associate your image with those keywords.
5. List
When creating web content, varying structure can help you hit a message home. One of my favorite content organization tools is the list.
Let’s start with the code for an unordered list:
<ul>
<li> first line item</li>
<li> second line item</li>
<li> third line item</li>
</ul>
Now let’s look at the code for ordered lists:
<ol>
<li> first line item</li>
<li> second line item</li>
<li> third line item</li>
</ol>
6. Horizontal Line
Let’s say your web design team just sent over a completed web page for your next campaign, but you want to separate part of the content by adding in one, quick, line between the content. You need to launch the campaign the next day and don’t want to go back to the web team yet again. No worries! Here’s the HTML tag to add to the page’s code:
<hr>
7. Text Formatting
Every CMS or COS should allow you to easily bold, italicize, and underline text in your content. But sometimes you’re messing with the title module of your page, or another component of a blog post, and need to input the code. In those instances:
<b> text to bold here </b>
<strong> text to bold here </strong>
<u> text to underline here </u>
<i> text to italicize here </i>
<em> text to italicize here </em>
8. Block Quote
If you’re building a customer testimonial page or writing a blog post after an interview with a thought leader, it can be helpful to make interesting quotes from the piece stand out. Here’s a simple code to help:
<blockquote> "Your quote here." </blockquote>
9. Social Share Link
To amplify the reach of your content, it’s helpful to include social share links. Whether you’re hyperlinking words or images, the following codes can help:
LinkedIn: http://www.linkedin.com/shareArticle?mini=true&url=URL
Facebook: http://www.facebook.com/sharer/sharer.php?u=URL
For Twitter, the code gets a bit complicated. An easier solution is to simply head to clicktotweet.com, enter your tweet, hit “generate code,” and use the generated URL as a normal hyperlink.
10. Line Break
As simple as the horizontal line tag is the line break tag. This simple tag comes in handy when you’re trying to simply add blank space between content. It looks like this:
<br>
11. Center Alignment
Let’s say you’re working on an email and want to center align an image or a body of text within the message. Here’s the tag you can use:
<center> Testimonial from Ben </center>
When it comes to right, left, bottom, and top alignment, the codes change from HTML 4 to 5. Your CMS or COS should help you make such adjustments easily.
12. Font Color
Let’s say you’re putting together a web page showcasing HTML tags for marketers to learn the basics of code. In this case, it might help to have the specific HTML tags stand out in a different color. Here’s the code you would use to change the font color to a different, basic web color:
<font color= "green"> This is text on your web page. </font>
Extra Tags For an Advanced Level
Customizing Contents with Colors
While the HTML tag for color we showed in the previous section allows you to use basic web colors, that may not be sufficient if you want to adjust colors to match your brand.
First, you’ll need to know the HEX code for your brand color. A HEX code is a six digit code that identifies a specific color on the web. You can use free browser extensions, like ColorZilla, to pick up any HEX code. That way, if you’re not sure what your brand HEX code is, you can just use the tool to pick up the color. Then you just need to input that code into the tag below:
<font color= "#F667F1"> These are the words I want in a different color </font>
Open Links In a New Window
When you’re working on marketing content, you want your visitors, leads, and customers to consume the content. I mean, that’s why you made it, right? To avoid pushing folks off your content when trying to weave in inbound links, use this tag to have your links automatically open in a new window:
<a href="URL goes here" target="_Blank"> the copy you want linked goes here </a>
Create Internal Pages Links
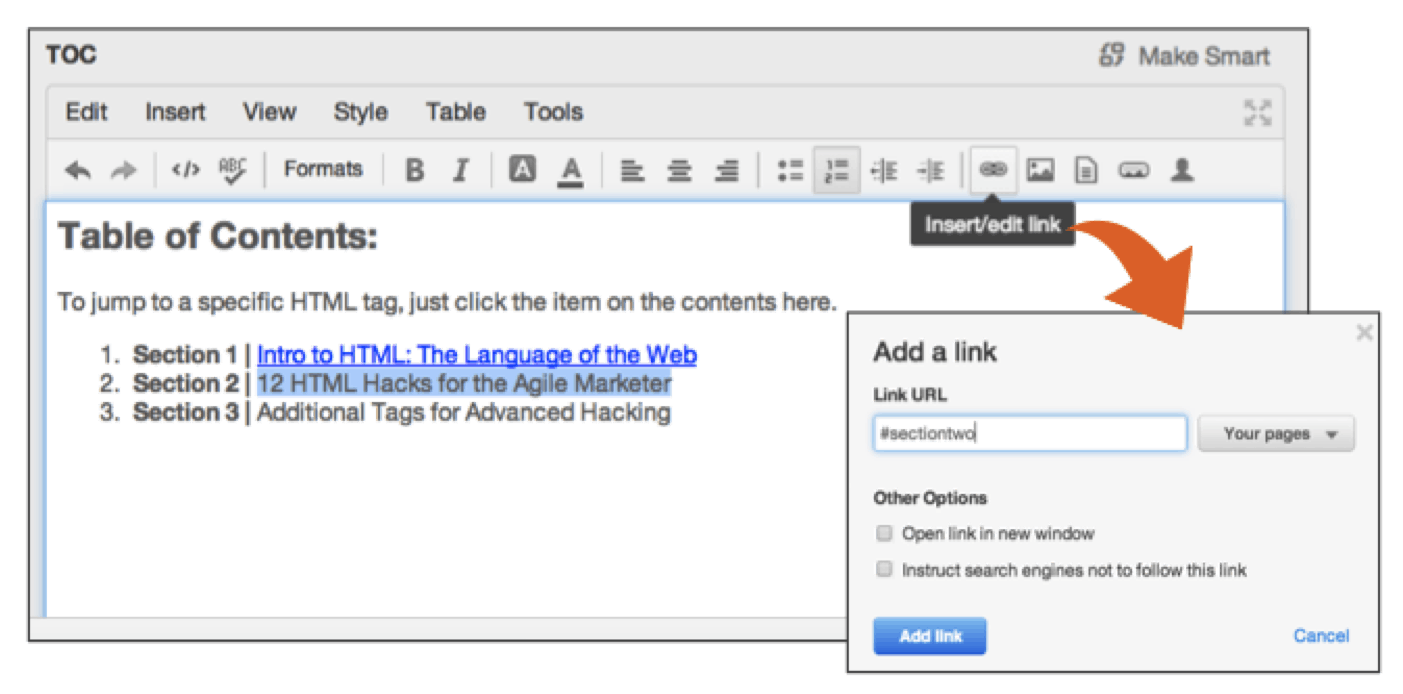
At the beginning of this page, we provided a table of contents that allowed you to jump down to specific sections. That was possible through internal linking. This involves two steps:
First, you’ll need to hyperlink the words you want linked with a hashtag and unique name. So if I was creating the internal link for section two under my table of contents, I can use the unique ID “#sectiontwo.” You can see how I then linked this in HubSpot here:
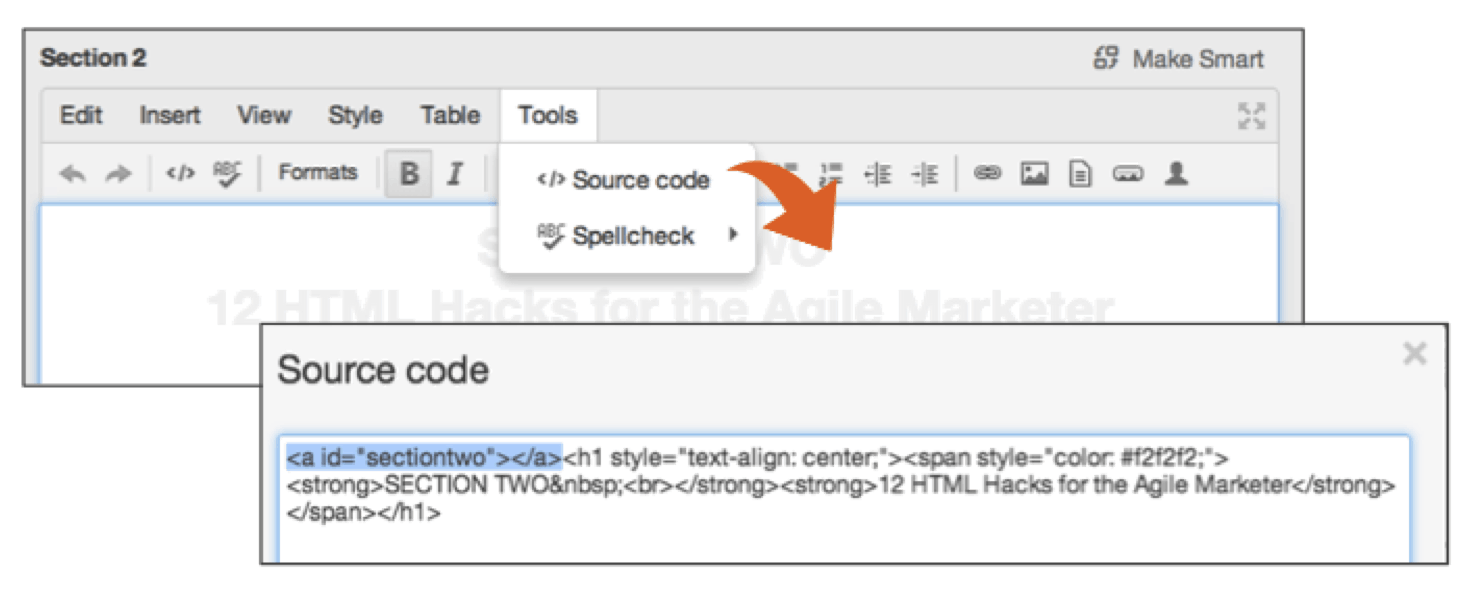
Next, you need to go to the content you actually want the link to go to and add the following code to the beginning:
<a id="UNIQUE-NAME"></a>
The code for my example would then look like:
<a id="sectiontwo"></a>
You can see below that I went to the part of my page for section two and added this line of code right before the location I want linked to:
Source : HubSpot