Tired of having to go through the admin panel just to update a plugin? Does it annoy you to have to click through so many menus just to switch to a new theme? There is a powerful tool on the block that you can use to access WordPress and update that plugin in a timely manner. WP-CLI is a command line toolset built specifically for WordPress. Let’s install WP-CLI and give it a test run! Before we begin, it is important to note that you should be running on a UNIX based system. This means that you should be using on a Linux or OS X machine. Also, you shoul dnote that you should follow the same steps when you are upgrading WP-CLI.
If you would prefer to follow the official instructions; the homepage can be found here. You can view the commands by clicking here. Let’s take a look at the requirements:
Requirements
- UNIX-like environment (OS X, Linux, FreeBSD, Cygwin)
- PHP 5.3.2 or later
- WordPress 3.5.2 or later
Step 1: Download
The first step to installing WP-CLI is to open the Terminal / Command Line. There are two ways to download WP-CLI: the curl and the wget command. Use the curl command for now and type this into your terminal:
curl -kL https://raw.github.com/wp-cli/builds/gh-pages/phar/wp-cli.phar > wp-cli.pharIf you have downloaded WP-CLI successfully, you should see this:

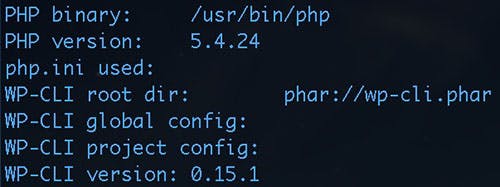
To double-check, type in the following command:
php wp-cli.phar --infoStep 2: Installing the Command
Let’s make things easier, and let’s try to make the wp command available. To do so, we will need to input two different commands. The first command will turn wp-cli.phar into an executable using the chmod command:
chmod +x wp-cli.pharIf no message appeared after pressing enter, do not worry! It means that you have successfully turned the wp-cli.phar file into an executable. Next, you will need to move the file /usr/bin/php/ directory to a directory that is in your $HOME path. You can do this using the following command:
sudo mv wp-cli.phar /usr/local/bin/wpAgain, do not worry if there was no message afterwards. If you use the “ls” command (without quotes), you should see the file in your main directory. You can test if you can run the “wp” command by entering:
wp --info
The output should look something like this:

If you have any issues getting WP-CLI to work on your MAMP server, then please follow the instructions on this page. This is because the php folder in the MAMP installation is completely different.
WP-CLI’s commands can be seen here. In order to make this work, you should change into your WordPress’ root folder: /wp/. To test it, you can run the ‘wp’ command, like so:
wp
If you have just downloaded WordPress, you will receive the following message:

The great thing about WP-CLI is that you can even manage your WordPress install with community-created commands. You can find these by clicking here. WP-CLI also has a Wiki that you can read through.
Example: Installing a Plugin
It’s very easy to install a plugin using WP-CLI. First you should change into the WordPress root directory using the Terminal / Command Line and then run the following command:
wp plugin install hello-dolly
The command should have installed the plugin in your WordPress install. You should try out some of the other commands as well!


