
There’s a new version of a REST-based API for your metadata needs; the great thing about this plugin is that it might even make it into the WordPress 4.0 core! This means that you will not need to download it as a separate plugin and that the program can now be used within WordPress. For now, let’s take a look at what the plugin does. Afterwards, let’s install the plugin and check out how it works.
Function
The point of an API, or application programming interface, is to allow other applications to interact and extract the metadata of a website, post or any other object. There are various formats that an API can output to, such as: JSON and XML. In other words, JSON REST API is an application programming interface that grabs your posts metadata and makes it available for any other platform, or even the same website, to interact with the data. The date is displayed in a format called JSON. You can have an infinite scroll on your website and have posts’ information (title, author, thumbnail) displayed. With that said, let’s install and activate the plugin
Step 1: Download, Install and Activate
The first step is to download the plugin and, as always, there are multiple ways to do this:
WordPress Plugin Panel:
- Get into the Dashboard
- Click on ‘Plugins’
- Click on ‘Add new’
- Type ‘JSON REST API’ into the search bar
- Click on ‘Download’
- Activate the Plugin
FTP:
- Download the plugin from here.
- Upload the plugin to your /wp-content/plugins folder
- Go to your to your dashboard
- Click on ‘Plugins’
- Find ‘JSON REST API’ and click ‘Activate’
Step 2: Check the API
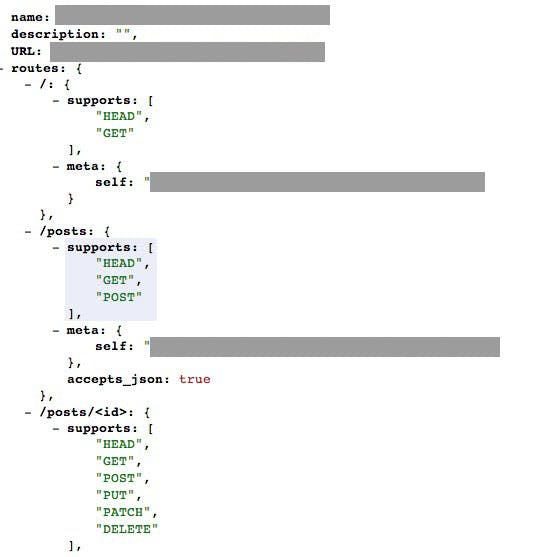
Now that you have installed the API, you will need to check if it is working. You check if the API is working by putting the following into your browser address bar:
http://www.example.com/wp-json/
Replace ‘www.example.com’ with your own URL. You should have something that looks like this:
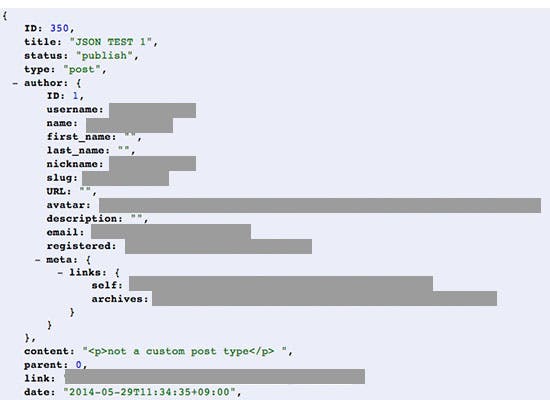
The next step is to see if JSON is retrieving your posts; for that, you should type in the following URL:
http://www.example.com/wp-json/posts
You should see something like this:
You can also get custom post types by inserting the URL written below into your browser:
http://www.example.com/wp-json/posts?type[]=post&type[]=page
You can replace ‘page’ at the end to query your custom post type. If your custom post type’s name is ‘test’, then your query would be:
http://www.example.com/wp-json/posts?type[]=post&type[]=test
Step 3: Writing the Requests
The final step in the process is writing the grab the JSON-formatted data and manipulating the data. I will not be able to exactly explain how this works but we can go over the basics. You can also find the documentation here. (Note: you will need to install a Markdown reading extension for your browser). Otherwise, you can also download the plugin which comes with the documentation. Generally, you would start using AJAX to get the requests from the JSON pages and then use Javascript to display the information. The code may change if you want it to automatically add new posts.
The ‘Getting Started’ and ‘Schema’ sections of the documentation are great places to start! See what you can accomplish with this plugin!